Face Emotion now predict the Age and Gender of the target face

Good news for PixLab customers!

The /facemotion endpoint now besides outputting the rectangle coordinates for each detected human face, you'll be able to accurately extract their gender, age and emotion pattern via their facial shapes in just a matter of few milliseconds thanks to our newly deployed machine learning models hosted on OVH and AWS instances simultaneously for worldwide availability.
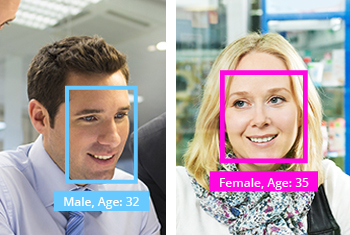
face emotion, gender and age

Below a Python sample to show you how easy is to predict the Age and Gender of any human face.

import requests
import json

# Detect all human faces present in a given image and try to guess their age, gender and emotion state via their facial shapes

# Target image: Feel free to change to whatever image holding as many human faces as you want
img = 'http://www.scienceforums.com/uploads/1282315190/gallery_1625_35_9165.jpg'

req = requests.get('http://api.pixlab.io/facemotion',params={
    'img': img,
    'key':'PixLab_API_Key',
})
reply = req.json()
if reply['status'] != 200:
    print (reply['error'])
    exit();

total = len(reply['faces']) # Total detected faces
print(str(total)+" faces were detected")
# Extract each face now 
for face in reply['faces']:
    cord = face['rectangle']
    print ('Face coordinate: width: ' + str(cord['width']) + ' height: ' + str(cord['height']) + ' x: ' + str(cord['left']) +' y: ' + str(cord['top']))
    # Guess emotion
    for emotion in face['emotion']:
        if emotion['score'] > 0.5:
            print ("Emotion - "+emotion['state']+': '+str(emotion['score']))
    # Grab the age and gender
    print ("Age ~: " + str(face['age']))
    print ("Gender: " + str(face['gender']))

You can visit the PixLab Github repository for additional code samples in various programming languages including PHP and Java.

Tag Image Endpoint Enhancements

The PixLab team is pleased to announce major enhancement to the /tagimg endpoint.

The image labeling endpoint let you programmatically generates a description of an image in human readable language with complete sentences. The description is based on the visual content as reported by our state-of-the-art image labeling algorithm. More than one description can be generated for each image. Descriptions are ordered by their confidence score. All descriptions are in English.

the /tagimg endpoint documentation is available to consult here and below a working Python code sample:

import requests
import json

# Tag an image based on detected visual content which mean running a CNN on top of it.

# Target Image
img = 'https://s-media-cache-ak0.pinimg.com/originals/35/d0/f6/35d0f6ee0e40306c41cfd714c625f78e.jpg' 
# Your PixLab key
key = 'My_PixLab_Key'

req = requests.get('https://api.pixlab.io/tagimg',params={'img':img,'key':key})
reply = req.json()
if reply['status'] != 200:
    print (reply['error'])
else:
    total = len(reply['tags']) # Total tags
    print ("Total tags: "+str(total))
    for tag in reply['tags']:
        print("Tag: "+tag['name']+" - Confidence: "+str(tag['confidence']))

You can visit the PixLab Github repository for additional code samples in various programming languages.

Introducing the PDF to Image API Endpoint

The PixLab team is pleased to introduce the PDF to Image API endpoint which let you convert any PDF file to a high resolution JPEG/PNG image format.

the /pdftoimg endpoint documentation is available to consult here and below a working Python code sample:

import requests
import json

# Convert a PDF document to JPEG/PNG image via /pdftoimg endpoint.

req = requests.get('https://api.pixlab.io/pdftoimg',params={
  'src':'https://www.getharvest.com/downloads/Invoice_Template.pdf',
  'export': 'jpeg',
  'key':'My_PixLab_Key'
})
reply = req.json()
if reply['status'] != 200:
    print (reply['error'])
else:
    print ("Link to the image output (Converted PDF page): "+ reply['link'])

You can visit the PixLab Github repository for additional code samples in various programming languages.

SOD Embedded 1.1.7 Released

Symisc Systems is pleased to release the first major version of the SOD library! SOD is an embedded, modern cross-platform computer vision and machine learning software library that expose a set of APIs for deep-learning, advanced media analysis & processing including real-time, multi-class object detection and model training on embedded systems with limited computational resource and IoT devices.

SOD was built to provide a common infrastructure for computer vision applications and to accelerate the use of machine perception in open source as well commercial products.

Notable SOD features

  • Built for real world and real-time applications.
  • State-of-the-art, CPU optimized deep-neural networks including the brand new, exclusive RealNets architecture.
  • Patent-free, advanced computer vision algorithms.
  • Support major image format.
  • Simple, clean and easy to use API.
  • Brings deep learning on limited computational resource, embedded systems and IoT devices.
  • Easy interpolatable with OpenCV or any other proprietary API.
  • Pre-trained models available for most architectures.
  • CPU capable, RealNets model training.
  • Production ready, cross-platform, high quality source code.
  • SOD is dependency free, written in C, compile and run unmodified on virtually any platform & architecture with a decent C compiler.
  • Amalgamated - All SOD source files are combined into a single C file (sod.c) for easy deployment.
  • Open-source, actively developed & maintained product.
  • Developer friendly support channels.

Programming Interfaces

The documentation works both as an API reference and a programming tutorial. It describes the internal structure of the library and guides one in creating applications with a few lines of code. Note that SOD is straightforward to learn, even for new programmer.

SOD in 5 minutes or less

A quick introduction to programming with the SOD Embedded C/C++ API with real-world code samples implemented in C.


C/C++ API Reference Guide

This document describes each API function in details. This is the reference document you should rely on.


SOD Github Repository

The official Github repository.


C/C++ Code Samples

Real world code samples on how to embed, load models and start experimenting with SOD.

OCR performance improved

As requested by our users, our /OCR endpoint gets more support for various languages including Arabic, Modern Hebrew, Russian & simplified Chinese.

bounding box coordinates are now enabled by default. For each request, besides the full text output, you get a bbox array where each entry of this array hold the target word and its bounding box (i.e. rectangle) coordinates. Each entry in this array is identified by an instance of the following JSON object:


{
    word: Extracted word,
    x: X coordinate of the top left corner,
    y: Y coordinate of the top left corner,
    w: Width of the rectangle that englobe this word,
    h: Height of the rectangle that englobe this word
}

The documentation is updated and available to consult at https://pixlab.io/cmd?id=ocr and a Python sample is provided on Github at https://github.com/symisc/pixlab/blob/master/python/ocr.py.

With that in hand, you can further tune your analysis phase for example by extracting each word via /crop and perform another pass if desired.

List of face detection & recognition endpoints

As requested by our users, the following are the list of endpoints that is provided by PixLab for all your face detection, recognition, generation & landmarks extraction tasks. These includes:

Here is two working Python code to illustrate this:

1.Detect all human faces present in a given image or video frame via facedetect and extract each one of them via crop:

import requests
import json
     
    # Target image: Feel free to change to whatever image holding as many human faces you want
    img = 'http://cf.broadsheet.ie/wp-content/uploads/2015/03/jeremy-clarkson_3090507b.jpg'
     
    req = requests.get('https://api.pixlab.io/facedetect',params={
        'img': img,
        'key':'My_Pix_Key',
    })
    reply = req.json()
    if reply['status'] != 200:
        print (reply['error'])
        exit();
     
    total = len(reply['faces']) # Total detected faces
    print(str(total)+" faces were detected")
     
    # Extract each face via crop now 
    for face in reply['faces']:
        req = requests.get('https://api.pixlab.io/crop',params={
            'img':img,
            'key':'My_Pix_Key',
            'width': face['width'],
            'height': face['height'],
            'x': face['left'],
            'y': face['top']
        })
        reply = req.json()
        if reply['status'] != 200:
            print (reply['error'])
        else:
            print ("Face #"+str(face['face_id'])+" location: "+ reply['link'])
  1. Detect all human faces in a given image via facedetect and apply a blur filter to each one of them via mogrify:

import requests
import json

img = 'http://anewscafe.com/wp-content/uploads/2012/05/Brave-Faces-Group-shot.jpg' 

# Detect all human faces in a given image via facedetect and blur all of them via mogrify.
req = requests.get('https://api.pixlab.io/facedetect',params={
    'img': img,
    'key':'Pix_Key',
})
reply = req.json()
if reply['status'] != 200:
    print (reply['error'])
    exit();

total = len(reply['faces']) # Total detected faces
print(str(total)+" faces were detected")
if total < 1:
    # No faces were detected, exit immediately
    exit()
# Pass the detected faces coordinates untouched to mogrify 
coordinates = reply['faces']
# Call mogrify & blur the faces
req = requests.post('https://api.pixlab.io/mogrify',headers={'Content-Type':'application/json'},data=json.dumps({
    'img': img,
    'key':'PIXLAB_API_KEY',
    'cord': coordinates #The field of interest
}))
reply = req.json()
if reply['status'] != 200:
    print (reply['error'])
else:
    print ("Blurred faces URL: "+ reply['link'])

Further code samples are available on the PixLab Github repository or refer to the PixLab Endpoints list for the official documentation.